
Cleaning your vape tank can seem like a frustrating chore but if you’re looking for a superior vaping experience, it’s one that should be undertaken on at least a semi-regular basis. Whatever you use – a tank, an RBA, or an all-in-one device – after a while, it will get both dirty and smelly.
How often you clean your vape tank depends on several things. For example, you’ll find that you will have to clean it more if you regularly use it outdoors, especially if you work in construction or agriculture. Small particles can get inside it and clog up everything, from your coil to your adjustable airflow mechanism. Also, you will need to clean it more often if you switch between different flavors often – some e-juice flavors just get stuck in those little nooks and crannies and are difficult to shift unless the tank is taken apart. Think coffee, menthol, grapes, and similar. Once your cheesecake vape juice starts tasting like a breath mint, it might be time for a thorough clean.
Luckily, this isn’t as hard as you’d imagine. Here are four simple and super easy ways to clean your vape tank:
- Soak in warm water and rinse – sometimes all your tank needs is some tender loving. If there are no major gunked up areas, a brief soak in warm water will do the trick.
- Soak your vape tank in PG or VG – pure PG (or VG, although it’s thicker and more difficult to clean with) can serve as a bactericide/fungicide and is extremely efficient at getting rid of any lingering smells in your tank.
- Use baking soda, alcohol, or vinegar – as you might have imagined, these household cleaning remedies will also do the trick when it comes to cleaning your vaping gear. Just remember to rinse vigorously afterward so you don’t end up vaping soda.
- Ultrasonic cleaner gets the job done every time – if you’re willing to invest a bit of money and streamline your gear cleaning, I suggest grabbing an ultrasonic cleaner.
Getting Ready to Clean Your Vape Tank
First thing’s first – before we get any cleaning done we have to disassemble the tank. Most newer ones have several moving parts that join together so you might have to referrer to the user manual. Don’t worry – it all screws off and on, and I don’t expect you will have any issues putting it back together.
Prepare everything before you start with the taking apart process. Depending on which method you will use you might need a bowl of water, clean paper towels, a small brush (a toothbrush for children will do nicely), alcohol, vinegar, and baking soda and that’s it.
Get everything close to hand and start taking your tank apart. Most likely, you will end up with a drip tip, a glass tubing, a base, several o-rings (take care of these, they are easy to misplace), and an atomizer (coil head).
Now you’re ready to get down to cleaning your vape tank!
NOTE: You can attempt to clean your atomizer with the rest of your tank. Often, it’s not going to give you great results (depending on the state of the atomizer) and it might require a more thorough cleaning. You’ll find a separate procedure for cleaning disposable (but often still salvageable) atomizers at the bottom of this text.
Cleaning A Vape Tank with Water
The easiest way to clean your tank is to use warm water – plain and simple! Fill a large bowl with warm (not hot) water and submerge all the parts of your tank in it. Water shouldn’t be hot because some tanks are glued together or have plastic/rubber parts that wouldn’t react well to excessive heat. Let the parts soak for a while (it would be best to leave them for an hour or two) and then gently clean them with a toothbrush to remove any juice or dirt that’s still clinging to them.
Give the parts one last rinse under the tap (you might want to close the drain for this to avoid accidents) and dry them with a paper towel. Leave them to sit on something absorbent (again, a paper towel will do), gently rolling them every couple of minutes to make sure that water comes out of every hole (like the chimney, drip tip, or air holes). You can speed up the drying process using a blow dryer – keep in mind that heat might damage or deform your o-rings. Personally, I always leave them on a paper towel for an hour – I burned one set of o-rings already and learned my lesson.
You can also add a bit of lemon or dish soap to the water as they might help with getting rid of more stubborn flecks. However, neither will help you get rid of a specific flavor smell. For that, we have to reach for something more potent.
PG or VG for Deeper Cleaning
I’m sure you’re familiar with VG and PG since without them, vaping would be very hard, indeed. But did you know that you can use them for cleaning your tank? I bet you didn’t! Both substances are antibacterial and antifungal, which means that they are great for getting rid of small particles that water just can’t deal with. I’m referring to stray flavors that get stuck in a vape tank.
Prepare as if you were cleaning your tank with water, only instead of water, pour a bit of PG into the bowl, just enough to submerge the parts, into a bowl (without heating it). I recommend you use PG because it’s less viscous and easier to clean afterward. After an hour or so, remove the parts, give them a good scrubbing, and leave them on a paper towel to dry. This might take a while so if you’re in a rush you might want to rinse them in warm water first.
A Bit of Vodka Goes a Long Way
…or baking soda. Or even vinegar! I’m pretty sure you have some of these laying around the house (vodka, in my case). All can be used to get your vape tanks sparkling again. Of course, use them diluted and don’t leave to soak too long, unless you want to damage your gear.
For example, when cleaning with baking soda, add one teaspoon of soda to the bowl and mix it so it dissolves more easily. As for vinegar and vodka, I find that two tablespoons are usually enough. You don’t have to use vodka – grain alcohol (ethanol) is probably more suited for this task. However, vodka will do in a pinch and it’s more likely that you will have it in the house (I know I do).
Again, allow the tank parts to soak in the solution for a while (not too long) and clean them with a toothbrush. After that, thoroughly rinse them in some warm water and leave to dry out. Keep in mind that you might have to rinse several times in order to get that faint smell of vinegar or vodka to completely go away.
An Ultrasonic Clean for a Brand New Vape Tank
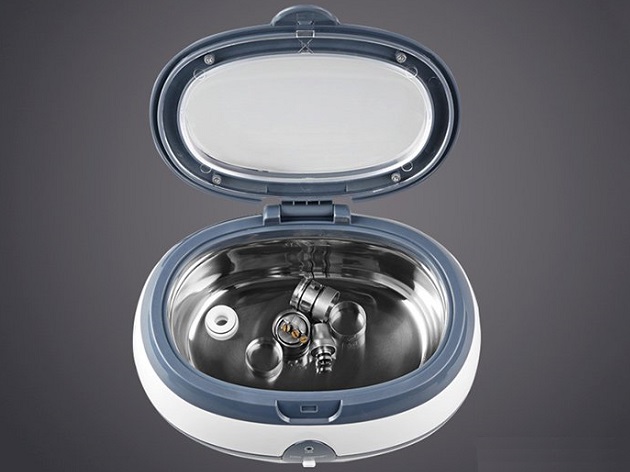
Ultrasonic cleaners for vape parts were quite new and exciting at one point. Today, they are pretty run-of-the-mill equipment for heavy vapers. Ultrasonic cleaners use ultrasound to break up accumulated dirt and grease and to clean anything from jewelry to vape tanks.
Plug your ultrasonic cleaner in and add water to it before submerging tank parts in. Some people use grain alcohol or special cleaning solutions, but water usually does the trick. Turn the device on and leave it for about 15 to 20 minutes (some ultrasonic cleaners have five or ten minute timers so make sure to get one that can keep working longer). After the cycle is done, simply rinse and dry your shiny new vape tank parts and you’re all set to vape.
Extra Tip – Cleaning Disposable Atomizers (Coils)
Cleaning atomizers (coil heads) is slightly tricker than cleaning other tank parts, but it’s also well worth it if you can do it. There’s a chance that you can extend the life of your disposable coils and spend less money on them in the long run.
Newer atomizers are difficult to clean because they need to be taken apart – to get the job done really well, you will have to open, rewick, and reassemble them. However, I have a couple of tricks up my sleeve that have worked for me in the past and I’d like to share them with you.
- Take the offending coil and leave it to soak in a mixture of hot water and grain alcohol. Remove it, shake off excess water and blow on the tip to dislodge some of the sediment in there. Soak it back in again for a couple of hours. Take a small piece of wire or a toothpick and poke around the coil (where you can see the wicking) to remove some of the gunk. Leave out to dry for at least 24 hours.
- Use an ultrasonic cleaner to try to clean the coils. It would be best to put in grain alcohol or to add a healthy amount of vinegar to the water. Again, try to dislodge some of the gunk and repeat the process before leaving the coil to dry out.
- Take a glass of water, put two denture cleaning tablets in it, and add your coils. It sounds funny, but, actually, the bubbly action, coupled with the built-in cleaning properties in the tablets, works great for removing gunk from coils and getting rid of lingering smells.
If the problem with the coil is that it still reeks of previous flavors you’ve used, this should solve it. However, if the coil is burnt out (because you didn’t take care of it!) then you will have to replace it with a new one or start making your own.
A Clean Vape Tank Makes For a Happy Vaper
It really does. Not only does it solve the ‘lingering taste’ problem but it also makes it so much easier to whip out your vaping gear in public. A vape tank that’s caked in vape juice is a horrible sight and makes selling vaping as something acceptable and non-toxic that much more difficult. A clean tank does the job much better.
Do you have any other vape tank cleaning techniques you would like to share? Or did you maybe have a breakthrough when it comes to cleaning disposable coil heads? If so, make sure to leave a comment, I would love to hear from you and add your tips and tricks to this list!